
Guide
Tidal: Five tips for the hi-fi streaming service
by Florian Bodoky
Apple’s streaming service includes Hi-Res quality. Keep reading to find out how to activate it and what else you can do to make Apple Music even better.
Apple Music offers many options to improve not only the music, but also the app itself. The following features will help you get the most out of your Apple Music subscription.
Unlike market leader Spotify, Apple Music allows you to stream content in Hi-Res quality. In Apple’s case, this means 24-bit depth and a sampling rate of up to 192 kilohertz (kHz). Apple also uses its own audio compression technology, namely ALAC (Apple Lossless Audio Codec). If you haven’t activated lossless technology, Apple Music will fall back on the non-lossless codec AAC (Advanced Audio Codec).
To activate lossless audio in the desktop version of the Music app, open «Music», «Settings» and the tab «Playback» to turn on the feature by ticking the «Lossless Audio» box. In the mobile app, you’ll find this option in the settings under «Apps», «Music» and «Audio Quality». You can then decide if you want lossless quality for streaming and/or downloads.
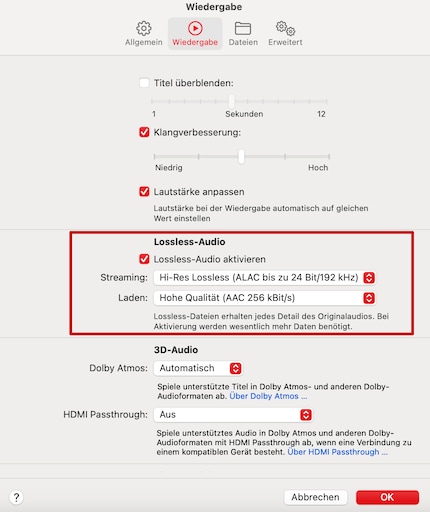
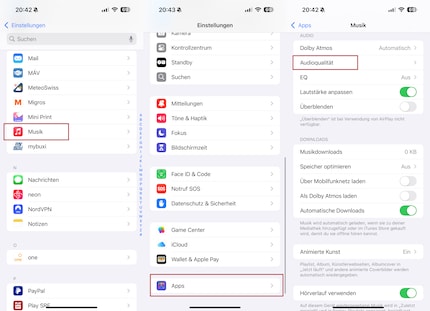
Apple offers three levels here: High Quality with the AAC codec and a bit rate of 256 kilobits per second (kbit/s) and 16-bit depth; Lossless with the lossless ALAC codec, 24-bit depth and a sampling rate of 48 kHz; and Hi Resolution Lossless with a sampling rate of 192 kHz. Apple hasn’t made any official statements regarding the bit rate for Lossless and Hi-Res Lossless. However, some indications of this leaked at the market launch of the Lossless feature. According to those, we’re looking at 1,600 kbit/s for Lossless and even 9,666 kbit/s for Hi-Res Lossless.
Keep in mind that better quality streaming consumes more mobile data, while downloading requires more memory on your iPhone or computer. If you go for High Quality, this uses about 1.92 megabytes per minute, with Lossless you’re already at 36 megabytes and with Hi-Res Lossless it’s a whopping 145 megabytes per minute. So let’s say you’re streaming a three-minute song in Lossless, this will consume 108 megabytes of your data volume or 108 megabytes of memory on your mobile.
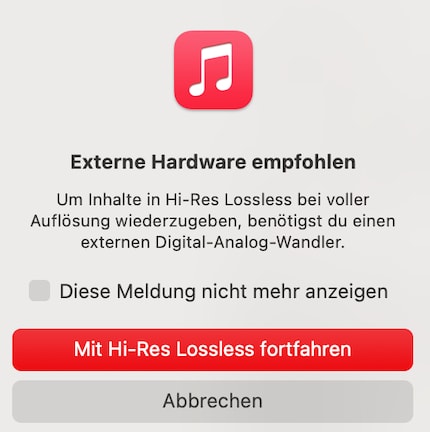
Please be aware that if you’ve connected a speaker or headphones via Bluetooth, the quality of the music will be reduced during wireless transmission. Apple also recommends using an external digital-to-analogue converter Hi-Res Lossless. The internal DAC integrated in newer Macs can only handle sampling rates up to 96 kHz.
Atmos is the latest (object-based) surround sound format from Dolby. If you want to experience surround sound like in a cinema, you’ve come to the right place.
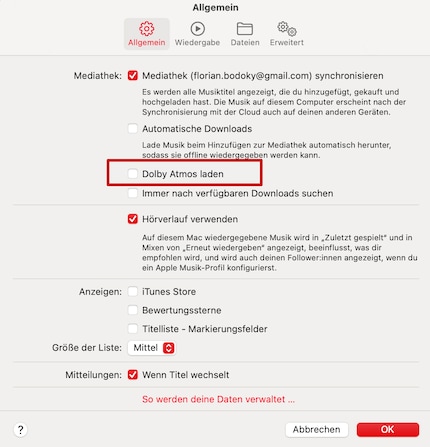
You can activate Dolby Atmos options in the «General» tab. Click on the «Download Dolby Atmos», click on the tab «Playback», scroll down to «Dolby Atmos» and select the «Automatic» option. On the iPhone, you’ll find the same option under «Apps», «Music» and «Dolby Atmos».
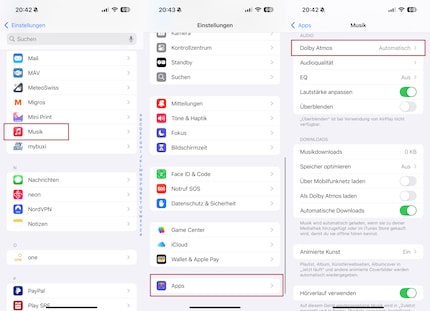
If you want all songs that support Dolby Atmos to be downloaded in this way by default, you can activate «Download as Dolby Atmos» in the «General» tab.
The details page of an album in Apple Music will tell you if the song you’re listening to supports Dolby Atmos.
On your Mac, you can also activate «Prefer HDMI Passthrough» in the same menu as Dolby Atmos. This makes sense if you’re using a sound system with an audio receiver via HDMI. The uncompressed stream’s then transmitted in Dolby standard (Dolby Digital, Digital Plus and Atmos). This only works on Macs with Apple M-CPUs and an integrated HDMI port.
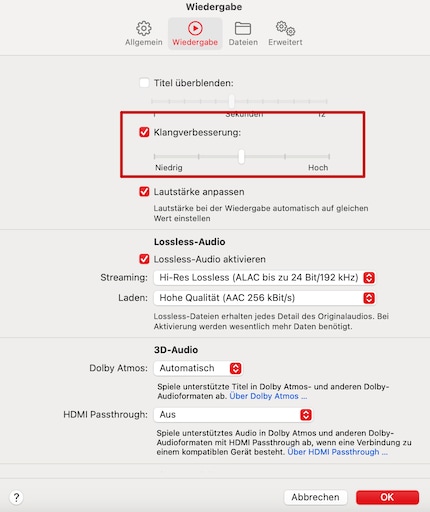
In «Music», «Settings» and the «Playback» tab, you’ll find the «Sound Enhancer» slider. Apple hasn’t been very clear about what exactly this slider does. On their website, they somewhat cryptically explain that it «increases the perceived ‘wideness’ of the stereo effect by modifying bass and treble response.» Basically, these are different EQ presets you can also change while listening to music.
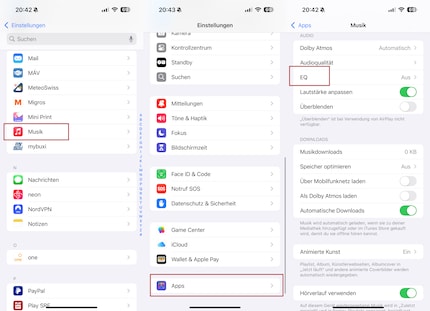
On your iPhone, you’ll find a selection of clearly labelled equaliser presets you can choose from in the settings under «Apps», «Music» and «EQ». For example, «Hip-Hop» or «Pop», but also «More Treble» or «Small Speakers».
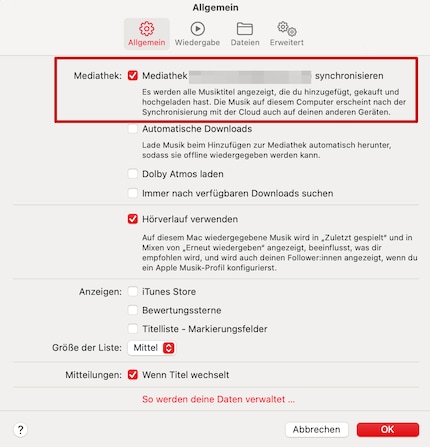
If you activate this option, all audio files on your hard disk will be synched with all your Apple devices – including content from third-party sources. You can activate this function by clicking on «Music» and then «Settings». In the «General» tab, check the top item. On your iPhone, go to settings, then tap on «Apps» and «Music». There, you can activate «Synchronize media library».
Go to «Music», «Settings» and the «General» tab, where you’ll also find the «Automatic Downloads» option. On your iPhone, go to settings, then tap on «Apps» and «Music». Here, you can activate the slider «Automatic Downloads». After you’ve activated this option, every song that you add to your media library will be downloaded automatically. This has the advantage that you can listen to these songs even when there’s no internet connection.
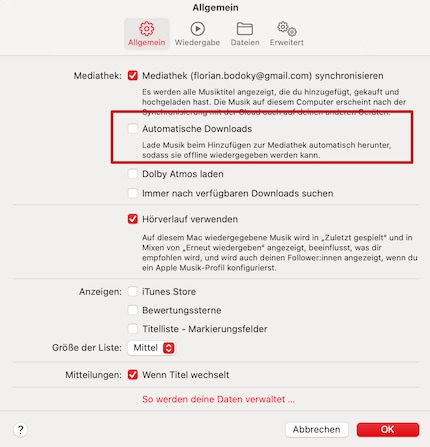
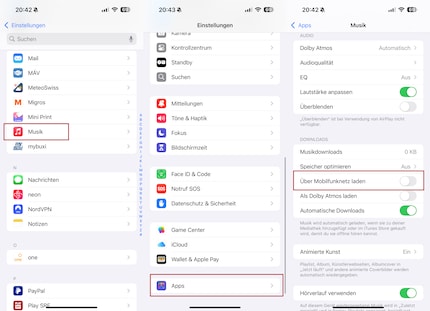
The disadvantage? It’ll devour memory on your smartphone or computer, especially if you download it in high quality. Your high-speed data allowance will also decrease very quickly – unless you have a flat rate. If this is the case, you can deactivate «Download Over Cellular», so your device will only download the music if you’re in a Wi-Fi network.
I've been tinkering with digital networks ever since I found out how to activate both telephone channels on the ISDN card for greater bandwidth. As for the analogue variety, I've been doing that since I learned to talk. Though Winterthur is my adoptive home city, my heart still bleeds red and blue.