
Background information
Why you should lube your switches
by Kevin Hofer

After more than two years, I'm giving my first DIY keyboard a facelift. The switches are already lubricated. Now there are more modifications to come, many of which I missed the first time around.
Sure, I love my DIY keyboard. The strange 75 per cent layout, including a numeric keypad yet lacking dedicated dot and comma keys totally suits me – I like it weird. But after little more than two years, the tinkering bug has gripped me, and I'm looking to renew my creation. I've already exchanged my Cherry MX Blue Clicky Switches for the new Immoral Panda ones. Gone are switches with palpable and audible feedback, it's all about tactile feedback now. Next up, stabilisers.
In my last article, I stated that clicky switches are the biggest mistake you can make in a DIY keyboard. But even if you choose those kinds of buttons, there's one graver sin: not lubing the stabilisers. Stabilisers – or stabs for short – are components that stabilise your longer keys. Metal rods connect to plastic holders, which in turn join with the PCB of your keyboard and the keycaps. This creates quite a bit of friction – even more than the switches themselves. Which is why they often rattle and clatter quite a bit.
Listen for yourself, I can hardly bear the Logitech G915:
I hardly noticed it before. But since I've got more into DIY keyboards, I can't «unhear» it. I won't even touch the G915 now.
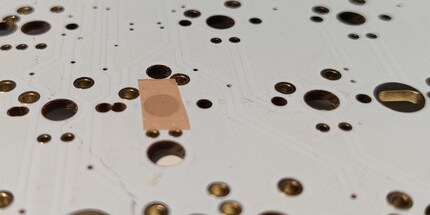
As with the switches, I'll need a brush and some lubricant for rod modding. This time, I'll also require a side cutter and some plasters. Yes, you read that right. Plasters. I'm modifying not only the stabs themselves, but also the attachment point on the PCB. In the mechanical keyboard community, plaster mods haven't been trending lately as their keystrokes feel slightly too soft when pressed through. I decided to do it anyway because my GMK stabilisers still rattled badly when I tested them without the patches. And a bit of impact protection for tactile keys never hurt anyone.
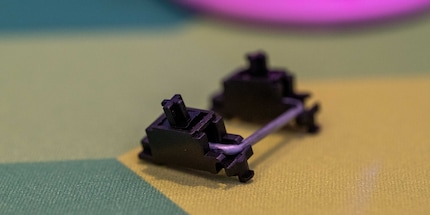
Stabilisers consist of three components: the metal connector, an outer plastic part that's screwed to the PCB in my build, and a plastic bit onto which the keycaps are placed that moves up and down. I separate the three components first, only lubricating the insides of the outer plastic bit and the wire. I won't bore you with the details now. Though I did base my build on the following YouTube video. Lacking the same lubricant as shown in the video, I used G-Lube instead.
The most important steps:
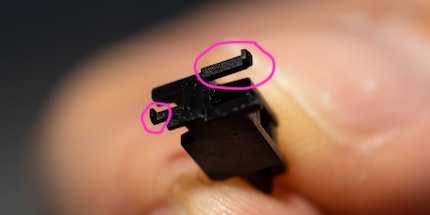
After that, I cut up another plaster and stuck it to the stabiliser attachment point. I then applied some lubricant before mounting the rods over them.
You can find a sound test below. As for now: I was able to eliminate some of the clatter using this mod, but unfortunately it wasn't quite enough, no matter how much lube I used. I'd probably need other stabs for that. My GMK stabilisers don't have the best reputation. Durock v2 are currently the ones to beat.
An aluminium cavity like the one on my KBD75 V1 aluminium case creates reverb. With Clicky Switches, this amplifies their characteristic sound. I decided against insulation in my original build as I enjoyed this feature. But in retrospect, I realised I really should have included at least some. Now having treated myself to some insulating foam, I have found that my keyboard sounds richer and clearer than ever before. I placed it between the lower part of the housing and the PCB. In addition, I could have placed insulating material between the aluminium cover plate and the PCB. I might do that on my next build.
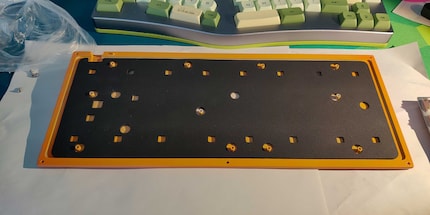
I really should've lubed the switches, modded the stabilisers and used dampening material on my first keyboard build. At the time, I also didn't really have a concept in terms of colour and overall look either. Since I replaced the keycaps anyway, I decided to spray the case too. For the keycaps, I went for a retro look in beige, light blue and orange – or as my colleague Phil puts it: yellowed. Since only a few of the caps are orange, I decided to spray-paint the case in a similar pastel tone.
A few more words about spraying keyboard cases for all my newbies out there. If you're already experienced, feel free to correct or add to my points in the comments. Here's what you should watch out for:
Unfortunately, my case didn't turn out perfect either. Some of the details still bother me. Maybe I'll remove everything soon and take another run at it.
Now, without further ado, the typing test.
In my opinion, the keyboard sounds richer and rattles less. I like the tone, and actually typing using the Immoral Pandas is pleasant. Simultaneously, the keys actually feel tactile. The cap feels long and round.
However, the sound of the space bar bothers me. It's too loud, and the sound is too shrill. Thankfully, I know a little trick. I'll need some Tesa neoprene foam sealing tape. Chloroprene rubber, in addition to scuba diving, is also suitable for reducing sound. The adhesive sealing tape fits perfectly inside the space bar. Since my board is open below the space bar, I also glued something to the PCB.
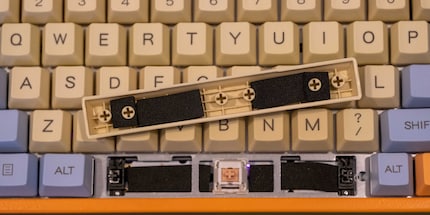
I like the sound much better this way. It appears more subdued and clear.
It's a real shame that I couldn't get rid of the stabiliser rattle completely. Nevertheless, the keyboard sounds and feels better than anything you can buy ready-made. At least in my experience, and I've been allowed to test quite a few keyboards from famous and less well-known manufacturers in my time. Its greatest advantage remains the almost infinite personalisation options – even the QMK firmware, where you can freely programme your keys via x-layer. Thus, even my peculiar 75 per cent layout without dedicated dot and comma keys is perfectly usable after some time.
But was it all worth the effort? Definitely, my keyboard now feels and sounds much better than before. For me, the DIY sector remains untouched. Especially since keyboard building is now also a hobby. I'm happy to make the effort, and it's fun. If you want to read more about DIY keyboards, why not take part in the survey or write your review in the comments.
Want more keyboard builds?
The competition has ended.
From big data to big brother, Cyborgs to Sci-Fi. All aspects of technology and society fascinate me.
Interesting facts about products, behind-the-scenes looks at manufacturers and deep-dives on interesting people.
Show all