
Background information
Keycap Kevin: I just wanted to win a keyboard, now I'm programming an interactive fiction game
by Kevin Hofer

I'm programming my first video game. The story is finished and I've learnt the necessary code. In order for my commands to conjure up images on the screen, I first have to create them. In my case, the graphics consist of photos.
I'm giving away the Lego-compatible Pixel keyboard. So that you don't have it so easy in the competition and hopefully also have fun, I want you to play. A game that I'm programming. I'm doing this for the first time in my life. Today I'm going to show you three examples of how I create my interactive story visually. If you missed the last articles, you can read them at the following links
In interactive stories, the graphics usually consist of static individual images in the background and the characters in the foreground. So that the whole thing doesn't appear motionless, I can bring life into the game with my commands.
In the game, you control Stevie. More precisely, you tell him what to do at certain points so that he can steal the keyboard of his dreams. Over the course of the game, his mood changes several times. So that these are not only represented by the text, his facial expressions and gestures should also change.
Since Stevie is a minifig - a Lego man - I can control the gestures by adjusting his limbs and taking photos of the different positions. Minifigs are not known for their articulation, but for my purposes it's enough. It gets more difficult with the facial expressions.
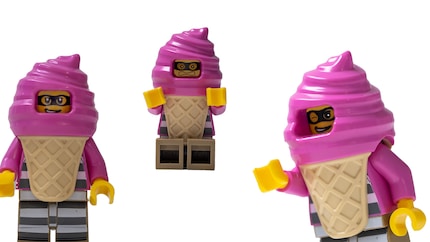
Stevie's head is adorned with a blindfold and he grins mischievously. This fits his character well as a "neutral" expression, which is how you usually see Stevie. He's outwardly self-confident, but in reality he's the classic loser. At the beginning, I started looking for suitable heads to put on Stevie and then photograph him wearing them. Unfortunately, I didn't really find much with a mask. I therefore opted for photoshopping - and with the drawing talent of a tomato.
My approach: I take a photo of Stevie with the desired gestures. In Photoshop, I then crop him out and remove the eyes, mouth and eyebrows, i.e. all the facial features of a minifig that represent emotions. I then draw the desired facial features based on templates of existing minifigs. I already have Stevie in various moods.
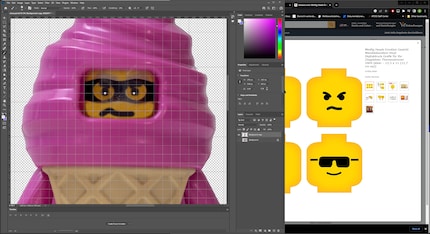
The whole thing doesn't look very professional, but it fulfils its purpose for the time being. If my requirements ever increase, I can overwrite the old images with new ones.
As befits an interactive story, wrong decisions lead to the story ending prematurely. One such "bad" ending is when Stevie is caught by the police. That's what I want to depict with the flashing police lights.
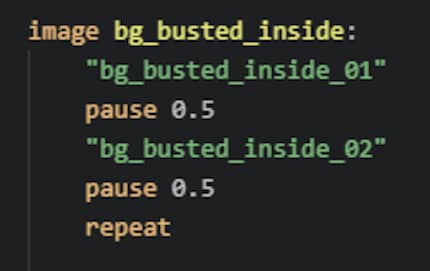
I call the Nanlite PavoTube II 6C my own. It has the police blue light as a preset effect. I arrange Stevie and the policewoman as I wish and switch on the blue light. Then I take a series of photos of the scene. I select two of these: One that is fully lit and one that is slightly darker. I use these two to create my animated background, basically a gif. My code for this looks like this:
This is what it looks like in the finished game. To make it even clearer what's happening here, I'll add a sound effect.
In the game, Stevie steals the pixel keyboard that I'm giving away. He chains it to the van. In one scene, Stevie breaks through a wall with his van. It looks like this in a first version:
So I need various things:
First I take care of the background. As I only have a few Lego bricks, I search an image database for a suitable background image. I find what I'm looking for on Shutterstock: A yellow Lego wall with a hole in the centre. Perfect. I fill the gap in Photoshop. So I have the same image once with a hole and once without.
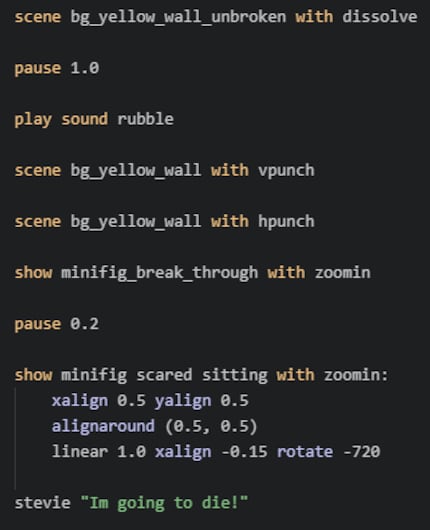
I now just have to add the images to the game with code. The intact wall is the first image in this scene. I leave it for a second. Before I overlay the broken wall with a wobble effect. I underline the whole thing with a sound effect.
Now it's the characters' turn. Right, I'm working with two Stevies for this scene. One time he's sitting in his van and another time you just see him in the foreground. The van and keyboard are the bigger challenge. I want it to look as if it's flying through the wall towards the screen. For the picture, I lift the van and keyboard to take a picture from slightly below. To do this, I hang the van from the ceiling on strings and I support the keyboard with cardboard boxes.
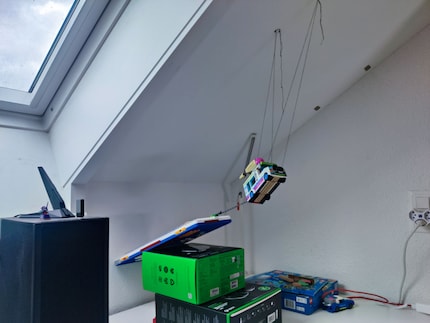
Now I just have to remove the superfluous elements such as cords and boxes in Photoshop. This is more difficult than expected with the black cords. Unfortunately, I didn't have any transparent strings to hand. After a bit of tinkering, however, everything is cleaned up and cropped accordingly.
I insert the picture with the van directly after changing the intact wall to the broken one. I zoom it in for effect. This makes it look as if it has shot through the hole.
Now all that's missing is Stevie. I take a photo of him sitting down and draw him a scared face in Photoshop. To make the effect of being shaken even better, I let him zoom into the picture while turning.
I'm still missing something. I have a few Lego bricks lying on the ground in front of the broken wall, but they would fly in all directions with so much pressure. So I look for a picture of yellow Lego bricks flying forwards. That turns out to be not so easy. In the end, I only find Duplos. But that's enough for my purpose. I set them free and add them to the van and the keyboard. Now I like the whole thing much better.
As code it looks like this:
From big data to big brother, Cyborgs to Sci-Fi. All aspects of technology and society fascinate me.
Interesting facts about products, behind-the-scenes looks at manufacturers and deep-dives on interesting people.
Show all